Introduction
This is basic instructions for handmade AWS 1700/2100 MHz 13-14dBi Double BiQuad 3G external antenna.I used computer software 4nec2 (antenna modeler and optimizer) version 5.8.11 to model theoretically the perfect antenna. All measurements based on very careful analysis with computer software which results many times has been proven to be quite accurate and reliable in physical world.
Description
The AWS-1, WCDMA-AWS-1700, WCDMA IV or UMTS1700 band uses microwave frequencies in two segments: from 1710 to 1755 MHz for Uplink, and from 2110 to 2155 MHz for Downlink. So the target for antenna is about in the middle - 1932 MHz. I believe for most of us more important is downlink, so lets shift from the middle to 2000MHz, it will boost Download speed.
Target frequency - 2000 MHz (for 3G / HSUPA / HSDPA / HSPA+ / LTE / 4G)
Simulation NEC Input files:
Configuration symbols in NEC Input files:
- ED - Element square diagonal length / 2
- WR - Wire radius
- S - Spacing between element and reflector
- RH - Reflector height / 2
- RL - Reflector length / 2
- LH - Height of reflector "lips"
All dimensions in .NEC data files and graphs are in wave-length ratio.
Main 4nec2 windows with parameters (antenna with lips on the left, without on the right)

Gain (antenna with lips on the left, without on the right)

Note: The dBi scale is logarithmic in base 10, where +3 dBi is a doubling in gain! An increase in gain of +1 dBi is equivalent to an increase of 26% and +2 dBi is equivalent to an increase of 60%. This means that the increase in +1dBi is big deal.
3D Radiation pattern

Overview
 |
|

Calculated measurements for antenna with "lips"
|
Calculated measurements for antenna without "lips"
|
| Section length - 2/√2×ratio×lamba = 37.9 mm ≈ 3.8 cm
Wire diamter - wire.radius.ratio×lambda×2 = 1.5 mm (Wire area A = πd2/4 ≈ 1.8 mm2)
Element spacing - element.spacing.ratio×lambda = 13.26 mm ≈ 1.3 cm
Reflector height - ver.length.ratio×lambda×2 = 152.34 mm ≈ 15.2 cm
Reflector length - hor.length.ratio×lambda×2 = 324.86 mm ≈ 32.5 cm
Height of reflector "lips" - lips.length.ratio×lambda = 37.7 mm ≈ 3.8 cm
|
Section length - 2/√2×ratio×lamba = 37.8 mm ≈ 3.8 cm
Wire diamter - wire.radius.ratio×lambda×2 = 1.5 mm (Wire area A = πd2/4 ≈ 1.8 mm2)
Element spacing - element.spacing.ratio×lambda = 12.75 mm ≈ 1.3 cm
Reflector height - ver.length.ratio×lambda×2 = 150.7 mm ≈ 15.1 cm
Reflector length - hor.length.ratio×lambda×2 = 282.53 mm ≈ 28.3 cm
|
Parts Required
|
|


Building the antenna
I will not show you picture after the picture how to drill the hole in center of reflector. How to use ruler. How to do proper soldering. What kits to use and etc. There are plenty of tutorials for these steps: http://www.ziva-vatra.com/index.php?aid=16&id=SGFyZHdhcmU=, http://martybugs.net/wireless/biquad/ or http://martybugs.net/wireless/biquad/double.cgi(Note: all calculations in links are for 2.4 GHz WiFi antenna. Use mine calculated data and measurements for AWS 1700/2100 MHz antenna.)
(Note: Pictures below not to scale)
Element bending
Use this PDF file for bending wire contour. Print without changing scale and contour will be correct size on paper.
Before you start to bend the wire, make it straight as you can.
 |
| Ensure each side of the element is as straight and symmetrical as
possible. The element sides are rectangular and widths are 3.8 cm, measured from wire center to wire center.
The more accurate you do the better as the analysis shows a huge impact in element dimensions.
|
 |
| Mine wire bending technique in the crossing sections.
Note: You must leave a ~1.5 mm gap between the element wires cross overs and solders.
|
Guidance and recommendations
 |
| N-connector in the center of reflector. Maintain correct reflector’s dimensions. |
 |
| Maintain correct spacing between the element and the reflector! 1.3 cm |
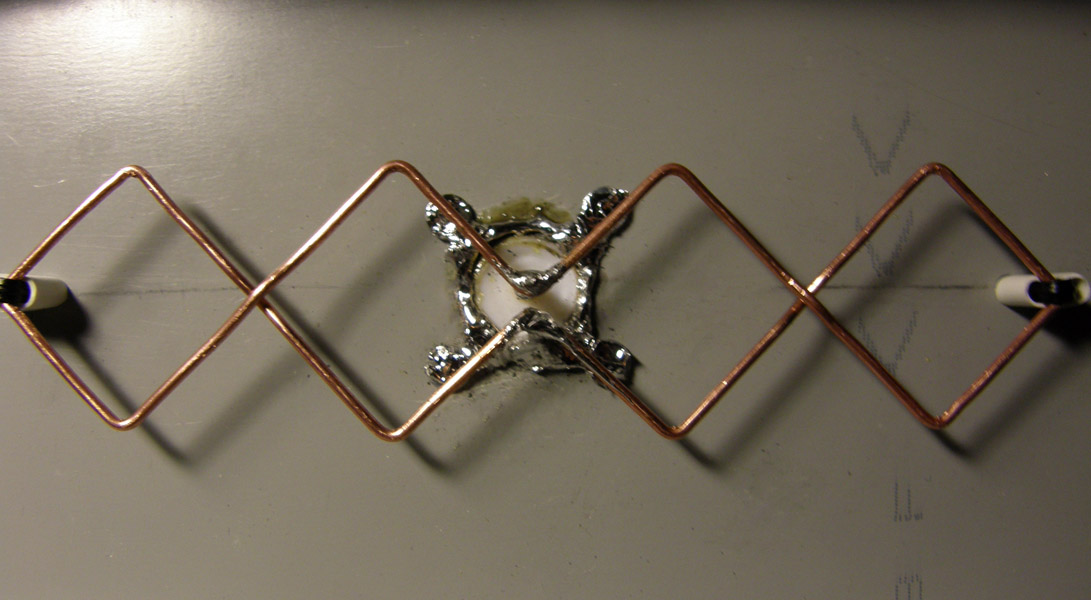 |
You must leave approx. 1.5 mm gap between the element wires cross overs and soldered contacts.
Use
spacers in each end of the element to strengthen its position and
spacing proper height between the radiator and the reflector.
Spacers
must be from any non-metallic material. |
 |
| Finished. Lying on the belly. |
Usage
 |
| This antenna should get the best performance at horizontal polarization. Note: The antenna is horizontally polarized then reflector is held vertically. |
Outdoor usage
If you intend to use this antenna outdoor, you will need to make it weather-proof to prevent corrosion.
Some people have used small tupperware containers, but it looks ugly at the top of the roof. I rather choose the corrosion… Or the good painting with some silicone on soldered contacts.


After you build your own antenna, you need proper cable with connectors to connect antenna with your modem.
Click here: Guide to Antenna Cables & Connectors
References
3.5 GHz antenna 4nec2 analysis and testing: http://wimaxvedlys.blogspot.com/2013/02/double-biquad-35-ghz-wimax-antenna.htmlMIMO technology tests, two antennas gives better performance (Use two only if you have weak signal with one): http://www.danlampie.com/?p=708
How-To: Build a WiFi biquad dish antenna: http://www.engadget.com/2005/11/15/how-to-build-a-wifi-biquad-dish-antenna
Last updated on 12 Jul 2014
question - what about antenna impedance and needs it a baloon or not?
ReplyDeleteThe calculation is made with 50 Ohms impendance (see Main 4nec2 windows with parameters), a Balun is usually not needed, the copper plate provides a good ground equivalent
DeleteAntenna impedance depends on the application on the types of devices being used; In Australia the only differing impedance for antennas are the televisions whose antenna /cable impedance is matched at 75 ohms on the other hand all other communications devices (as far as I am aware) are matched at 50 ohms thus the calculations and design used above I presume would have taken this in to account and be matched at 50 ohms.
ReplyDeleteInteresting post. I am trying out the antenna for my 4G modem. The links to the two NEC files are broken. Is it possible for you to post them again? Thanks for the great work!
ReplyDeleteNice work ;-) I'd love to take a look at the two .NEC files, but the links are broken. Would it be possible for you to update them?
ReplyDeleteIf ny WWAN 4G router has 2 4g antenns, would it be better to tune 1 antenna for 1700 and the other for 2100? Wouldn't diversity become less important with these higher gain antennas?
ReplyDelete