Introduction
This is basic instructions on building a double biquad antenna for 3.5 GHz frequency with approx. 14 dBi Gain. (13 dBi if without lips)Note: The dBi scale is logarithmic in base 10, where +3 dBi is a doubling in gain! An increase in gain of +1 dBi is equivalent to an increase of 26% and +2 dBi is equivalent to an increase of 60%. This means that the increase in +1dBi is a big deal.
All antenna measurements based on careful analysis and testing: see here
Overview
|
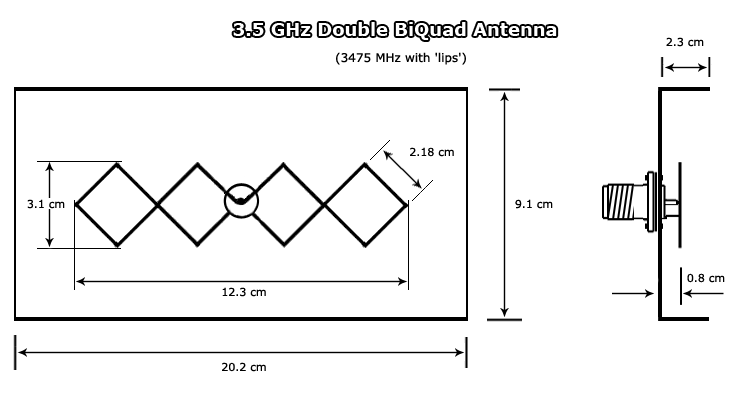
Section length - 2/√2×0.1789×86.2446≈21.820 mm ≈ 2.18 cm (analysis shows huge impact on correct size)
Element spacing - 0.0915×86.2446≈7.891 mm ≈ 0.8 cm
Reflector dimensions - 20.2x13.7 cm with ‘lips’, or 20.2x9.1 cm without ‘lips’.
For more see analysis.
Parts Required
|
|
Building the antenna
I will not show you picture after the picture how to drill the hole in center of reflector. How to use ruler. How to do proper soldering. What kits to use and etc. There are plenty of tutorials for these steps: http://www.ziva-vatra.com/index.php?aid=16&id=SGFyZHdhcmU=, http://martybugs.net/wireless/biquad/ or http://martybugs.net/wireless/biquad/double.cgi(Note: all calculations in links are for 2.4 GHz WiFi antenna. Use mine calculated data and measurements for 3.5 GHz antenna.)
Element bending
Use this PDF file for bending wire contour. Print without changing scale and contour will be correct size on paper.
Before you start to bend the wire, make it straight as you can.
 |
| Mine wire bending technique in the crossing sections. Note: You must leave a ~1.5 mm gap between the element wires cross overs and solders. |
Guidance and recommendations
 |
| N-connector in the center of reflector. Maintain correct reflector’s dimensions. |
 |
| Maintain correct spacing between the element and the reflector! 0.8c m (or 0.7 if yours without lips) |
 |
| Finished. Lying on the belly. |
Usage
 |
| This antenna should get the best performance at horizontal polarization. Note: The antenna is horizontally polarized then reflector is held vertically. |
As the 4nec2 modeling shows significant impact on the wire’s thickness and element spacing, it was time to see what would happen in real life with various thickness of wire and various spacing for element. Sadly I don’t have a laboratory, neither can find one around, so the testing was made in home conditions as best as I could (It took all weekend to test 4 types of wire with different polarization and spacing, repeating tests hundreds of times):
 |
| VP – Vertically polarized; HP – Horizontal polarized; H- Wire Spacing; D - Wire Diameter |
CINR [dB] - Carrier to Interference + Noise Ratio (sometimes SINR:
Signal to Interference + Noise ratio). Higher values are better.
RSSI [dBm] - Received Signal Strength Indicator. Higher values are better (Note: Its negative, higher is closer to zero).The main impact is in CINR as its shows the channel quality, possibility to choose better modulation.
For more information see analysis
Outdoor usage
If you intend to use this antenna outdoor, you will need to make it weather-proof to prevent corrosion.
Some people have used small tupperware containers, but it looks ugly at the top of the roof. I rather choose the corrosion… Or the good painting with some silicone on soldered contacts.
Cost
- 3 Euros for antenna
- 12 Euros for 2 meters professionally made coaxial cable SMA(m) to N(m)
- Time.
Two sector antennas at work
 |
| Note: Distance from Base Station and my antenna is 2.1 km, almost clear visibility. |
Burst Data shows the modulation, as you see above, I enjoy 16-QAM ¾ / 64-QAM ¾ the same I get from one external antenna. (modulation table below).
 |
| Source: http://www.wimaxforum.org/news/downloads/Mobile_WiMAX_Part1_Overview_and_Performance.pdf |
After you build your own antenna, you need proper cable with connectors to connect antenna with your modem.
Click here: Guide to Antenna Cables & Connectors
References
This antenna 4nec2 analysis and testing: http://wimaxvedlys.blogspot.com/2013/02/double-biquad-35-ghz-wimax-antenna.htmlMIMO technology tests, two antennas gives better performance (Use two only if you have weak signal with one): http://www.danlampie.com/?p=708
How-To: Build a WiFi biquad dish antenna: http://www.engadget.com/2005/11/15/how-to-build-a-wifi-biquad-dish-antenna
Last updated 07 Jul 2014


No comments:
Post a Comment